
By Joey Peppels
Fresh, natural makeup has never meant covering every freckle, line or uneven patch to me. In fact, the more I tried to perfect my complexion, the less fresh it usually looked. I would add another pump of foundation, brighten the entire under-eye area and powder every place that might become shiny. The result was technically “finished,” but it often looked heavier than I felt.
My approach changed when I began treating makeup as a series of small corrections instead of one complete mask. I prepare the skin, even only the areas that need it, bring color back to the cheeks and lips, and leave a little natural variation visible. That is what makes the face look alive.
Mature skin does not need less beauty or less creativity. It simply responds better when I pay attention to texture, hydration, placement and the amount of product on my brush. These are the steps I use when I want my makeup to look polished at normal conversation distance, not just flawless under a magnifying mirror.

What Makes Makeup Look Fresh Rather Than Heavy?
For me, freshness comes from three things: skin that still looks like skin, color placed where the face naturally flushes, and soft definition around the eyes and brows. None of those requires a complicated routine.
I usually get a better result from one thin layer and a few precise touch-ups than from several full layers. If my redness is mostly beside the nose, I correct it there. If the center of my face needs evening but the outer cheeks already look good, I leave the cheeks alone. If one under-eye shadow bothers me, I conceal that shadow instead of painting a pale semicircle from the nose to the temple.
This selective approach matters because skin changes with age. The National Institute on Aging explains that skin can become thinner, drier and more fragile over time. Makeup does not cause those changes, but a thick, dry or inflexible layer can make them easier to see. I would rather work with the surface I have than ask it to behave like a completely different kind of skin.
If I want more ideas beyond this everyday routine, I use this broader collection of makeup tips for mature skin as a reference. The principle I return to most often is simple: improve the finish by changing placement and quantity before buying another product.
1. I Prepare the Skin, Then Give It Time
My best natural makeup days begin before foundation. I cleanse gently, apply the skincare my face actually needs and wait for the surface to settle. If my skin still feels slippery, foundation can move. If it feels tight or rough, pigment can grip in little patches.
I do not use a large amount of moisturizer simply because my skin is mature. I use enough to make the skin comfortable, then press my fingertips over the face to find any areas that still feel dry. The sides of my mouth and the tops of my cheeks sometimes need a touch more, while the center of my forehead may need nothing extra.
Hydration works best when it is part of skincare rather than a rescue layer buried under makeup. The American Academy of Dermatology recommends applying moisturizer while the skin is still damp so it can help trap water. I follow that idea after cleansing, then allow several minutes before starting makeup.
Just before foundation, I blot obvious residue with a tissue rather than rubbing it away. I use primer only where it solves a real problem. A hydrating or smoothing primer may help around dry texture; a light gripping primer may help where makeup disappears. I do not automatically layer the same primer over my entire face.
2. I Treat Sunscreen as Part of the Base
Sunscreen is not a makeup primer, but it sits directly underneath makeup, so its texture affects everything that follows. I look for one that I can comfortably wear in the correct amount and let it form an even layer before adding color.
I do not rely on the SPF in foundation as my only sun protection. The American Academy of Dermatology advises choosing broad-spectrum, water-resistant sunscreen with an SPF of 30 or higher. Once mine has settled, I press foundation over it instead of dragging a brush repeatedly across the face.
If products roll into little flakes, I do not immediately add powder. I check whether I used too much skincare, rushed the drying time or combined textures that do not sit well together. On another morning I may simplify the layers. A calm base almost always looks fresher than a complicated base I have had to repair.
3. I Use Less Foundation and Place It More Carefully
I start with less foundation than I think I will need—often half a pump or a few small dots. I place most of it through the center of the face, where I tend to have more redness and uneven tone, and blend outward. By the time I reach the hairline and jaw, very little should remain on the sponge or brush.
I like a light-to-medium, flexible formula for everyday makeup, but technique matters more than the words on the bottle. A full-coverage foundation can look natural when I sheer it out. A tinted moisturizer can still look heavy if I keep layering it over dry areas.
I press or lightly stipple rather than polishing the same area for a long time. Once the coverage looks even, I stop. Continuous blending can lift what has already set, mix foundation with skincare and create tiny patches that tempt me to add more.
When a base starts breaking apart, I use a clean sponge to press the edges together and correct only the missing area. My detailed guide to stopping foundation from separating on mature skin goes further into layer compatibility, drying time and targeted setting. The biggest lesson is that separation is rarely fixed by placing another heavy layer over the whole face.
4. I Conceal Shadows, Not the Entire Under-Eye Area
Bright concealer can make the eyes look awake, but too much can create a flat pale zone that emphasizes every movement. I use a small mirror to find the darkest part of the shadow—usually near the inner corner or along a short hollow—and place a pin-sized amount there.
I tap the edge with a fingertip or a small soft brush. I do not pull the concealer all the way to the lower lash line unless discoloration is actually present there. Leaving some natural skin visible helps the concealer flex when I smile.
If I still need coverage, I add one more tiny dot. I get a smoother result from two controlled additions than from one large triangle. I also avoid choosing a shade that is dramatically lighter than my face. A close skin match with a subtle peach or neutral undertone usually corrects darkness more naturally than a very pale color.
5. I Keep Brows and Eyes Soft but Visible
Natural makeup can still include eyeliner, mascara and defined brows. The difference is that I use them to restore contrast rather than draw three separate dark shapes around the eye.
I brush my brows first and pencil only the gaps or shortened tail. At the inner brow I use almost no pressure. Through the body I follow the direction of real hair, and at the tail I keep the final point narrow. A spoolie softens any mark that looks too perfect.
For the eyes, I like a quiet wash of taupe, beige, soft brown or muted plum. I keep the deepest color near the lash line, where it makes the lashes look fuller without covering the lid in darkness. Brown, charcoal, navy and plum liners often give me enough definition with less severity than a thick black line.
I curl the lashes if comfortable and apply mascara from the roots, separating as I go. Clumps can make a minimal eye look heavier than intended, so I would rather use one careful coat than repeatedly layer while the formula becomes tacky.
I also keep eye-area hygiene practical. The FDA advises women to use products around the eyes only when they are intended for that area and discard eye makeup after an eye infection. I never thin mascara with water or saliva, and I stop using anything that causes burning or swelling.
6. I Bring Life Back With Cream Blush
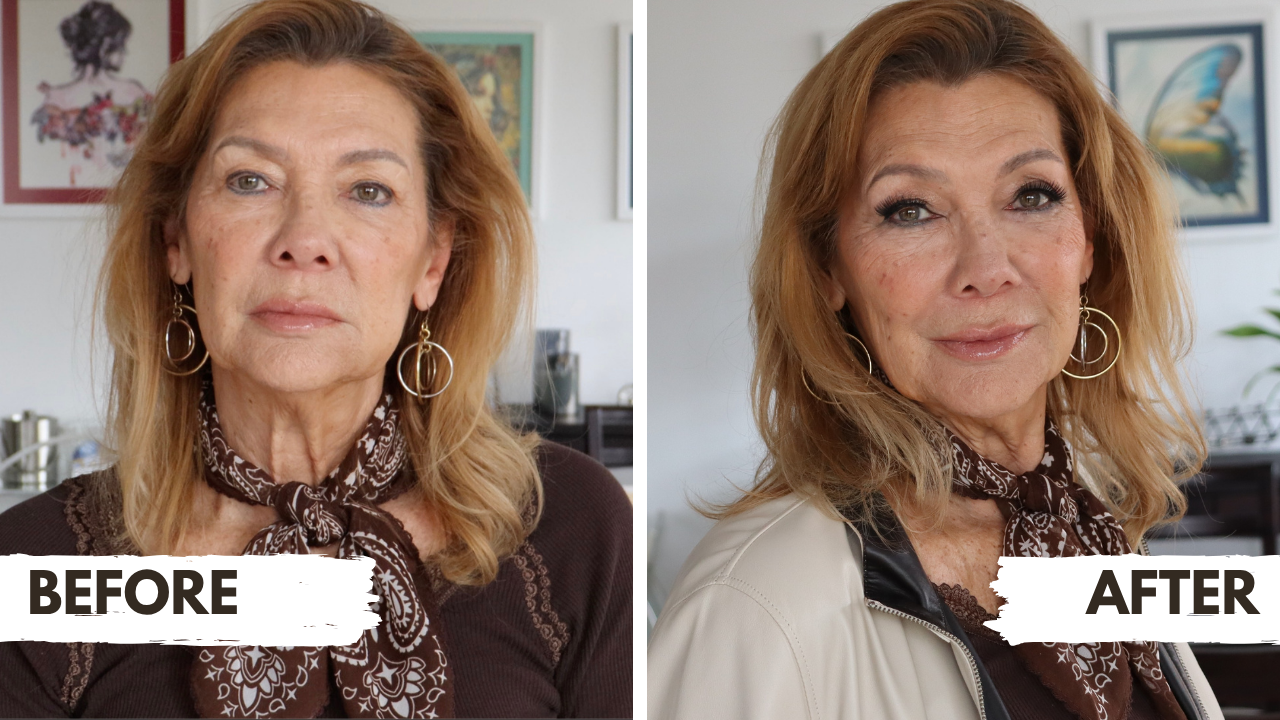
Blush is often the step that turns an even complexion into a fresh one. Foundation reduces redness everywhere, including the healthy color that once made the face look animated. I put a little of that color back rather than trying to create freshness with highlighter alone.
I tap a cream or liquid blush onto the upper outer cheek and blend the edges upward. I begin with less than one fingertip of product. If I can see a round stamp or a sharp stripe, I use a clean finger or sponge to soften the perimeter without wiping away the center.
The ideal placement depends on the face. I do not believe every woman must avoid the apples of her cheeks after a certain birthday. I simply check the result with my expression relaxed. If the color looks low or pulls the face downward, I move the next application slightly higher.
Powder blush can look beautiful too, especially when it is finely milled and applied with a soft brush. I make sure the base underneath has settled, tap excess from the brush and sweep once before deciding whether I need more. My step-by-step guide to applying blush on mature skin explains how I adjust placement for different face shapes and formulas.
7. I Powder Only Where Movement or Shine Distracts Me
Powder is useful; it is not a mandatory final coating. I use a small, loose brush and set the places that crease, transfer or become distractingly shiny. For me, that may be beside the nose, over a concealed blemish and through the center of the forehead. The outer cheeks often look better untouched.
I load the brush lightly, tap it off and press rather than scrub. If I can see a pale film, I have probably used too much. A clean brush can lift away some excess, and a light mist followed by gentle sponge pressure can help the layers look united again.
I still want dimension in the face. A little natural sheen on the upper cheek can look healthy; it does not automatically mean the makeup is failing. I distinguish between fresh luminosity and a slippery area where foundation is moving.
8. I Choose Comfortable Color for the Lips
A fresh face can look unfinished if the lips are completely erased by foundation. I wipe away any base that reached them, apply balm while I finish the rest of the face, and then choose a comfortable color close to a natural lip or soft rose tone.
If I use liner, I soften it inward rather than leaving a hard ring. I may correct a fading outer corner or gently balance the cupid’s bow, but I do not redraw the whole mouth unless I want a more glamorous result.
Very glossy formulas can travel, while very dry matte formulas can make the lips feel tight. I often prefer a satin lipstick, tinted balm or creamy pencil blotted once. The slight stain that remains usually looks more natural than a thick surface layer.
Common Mistakes That Make Natural Makeup Look Heavier
Adding coverage every time I see texture
Texture is not the same as discoloration. Foundation can even tone, but it cannot remove pores or expression lines. When I keep adding product to make texture disappear, I usually create more visible texture instead.
Using bright concealer as a lift
Placement can lift the eye more convincingly than a large pale patch. I correct the actual shadow and keep the outer under-eye area thin.
Making every feature equally strong
Dark brows, heavy liner, intense blush and a strong lip can all be lovely, but together they are no longer a minimal look. For everyday freshness I choose one gentle focus and let the other features support it.
Checking only in a magnifying mirror
Magnification helps me place a small stroke, but it exaggerates every gap and line. I repeatedly step back. If the makeup looks balanced at the distance where another person would speak to me, I do not keep correcting it for a ten-times mirror.
Trying to make the face completely matte
A flat finish can remove the dimension that makes natural makeup believable. I set movement strategically and allow a controlled glow to remain where the skin naturally catches light.
My Simple Ten-Minute Fresh Makeup Routine
- I let moisturizer and sunscreen settle while I dress or arrange my hair.
- I press a thin layer of foundation through the center of the face and blend outward.
- I conceal only the darkest under-eye shadow and any redness still showing.
- I brush the brows, fill obvious gaps and soften the result with the spoolie.
- I add a light taupe shadow, soft liner near the upper lashes and one separated coat of mascara.
- I tap cream blush onto the upper cheek and use the remaining color on the brush or finger to connect the look.
- I powder only the areas that move, then finish with a comfortable rose or neutral lip.
Before leaving the mirror, I turn toward daylight and relax my face. I look for a line of foundation at the jaw, a concealer edge under the eyes, a blush stamp or one brow that has become much darker than the other. I correct those edges, not the entire application.
Final Thoughts
The freshest makeup I wear is rarely the makeup that uses the fewest products. It is the makeup in which every product has a clear job and stops once that job is done.
I hydrate without leaving the surface slippery, even the complexion without hiding all of it, brighten only the shadows, restore gentle color and set only where needed. I keep stepping back because the whole face matters more than any single pore or line.
Mature skin does not have to look perfectly smooth to look beautiful, rested and alive. When I let some natural texture, warmth and movement remain, the makeup becomes part of my face instead of sitting on top of it. That is the finish I now think of as truly fresh.



Leave a Reply